Need advice? Let's talk.
Get straightforward guidance from your broadcasting partner. Schedule a call to chat with the team about your radio station.
Book DemoInternet Radio for Magazines, Blogs, and Publishers
How internet radio for magazines, blogs, and publishers can help you increase your station's audience and turn them into customers.

Internet radio is now serious business and its popularity is growing every day. In fact, in 2016 alone more than 50 million people listened to the radio on the internet every week. So if you have a blog and you are looking for ways to increase your audience then supplementing your blogs written content with audio content is a great idea. However, setting up an internet radio station can be a confusing and time-consuming process if you are new to this type of thing. In this guide, we are going to look at the steps you need to take to set up an internet radio for magazines, blogs, and publishers.
Here’s a quick overview of some of the points we’ll cover:
- Determining the type of station you want to run
- Setting up your station
- Licensing explained
- Promoting your station
- Extending your content's shelf life
- Monetising your station
Determining the Type of Station You Want to Run
Like blogs, the genre, niche or audience you serve with your radio station is practically limitless. So one the first thing you need to ask yourself is what kind of station do I want to run? Do you want to run a music station, a talk station or a combination of the two?
The easiest way to answer this is to look at the type of content you are currently producing and what currently works well with your audience. The better understanding you have of your audience the stronger your station concept will be.
Now obviously if you run a music blog talking about the hottest new music then it would be a no-brainer to focus your station’s output around this. Alternatively, let’s say you run a blog which focuses on sport, then it creating a station in a similar vein to ESPN Radio would make the most sense.
The great thing about running your own station is that you are already producing the content you need, just in written form. So it’s not a huge amount of additional work to convert the posts and features you are writing into a segment for your station.
A great example of a blog who run their own station is Whalebone Magazine. Whalebone Radio showcases an eclectic range of music, comedy and talk segments based on the type of content they are already producing. So for example, if one of their writers is off to interview a new band then they will take along their recording equipment and also record the interview to use on the station.
It’s also worth mentioning that, as most blogs make their revenue from banners and site advertisements, your radio stream is another place you can sell advertising space to your clients.
Setting up Your Radio Station
1. Create Your Account
Radio.co provides you with all the features you need to successfully create a radio station for your blog.
You can start a 7 day free trial of Radio.co here and if you want to check out Radio.co's features and you haven’t done already then we recommend taking the product tour before beginning your free trial.
2. Upload Your Media Files
Once you have created your Radio.co account, the next step is to upload and organise your media files.
Just drag and drop files in your browser. Whether it's in batches or a one-off, media management is easy with an all-in-one place for music, jingles, sweepers, and voice overs.
3. Create Your Tags
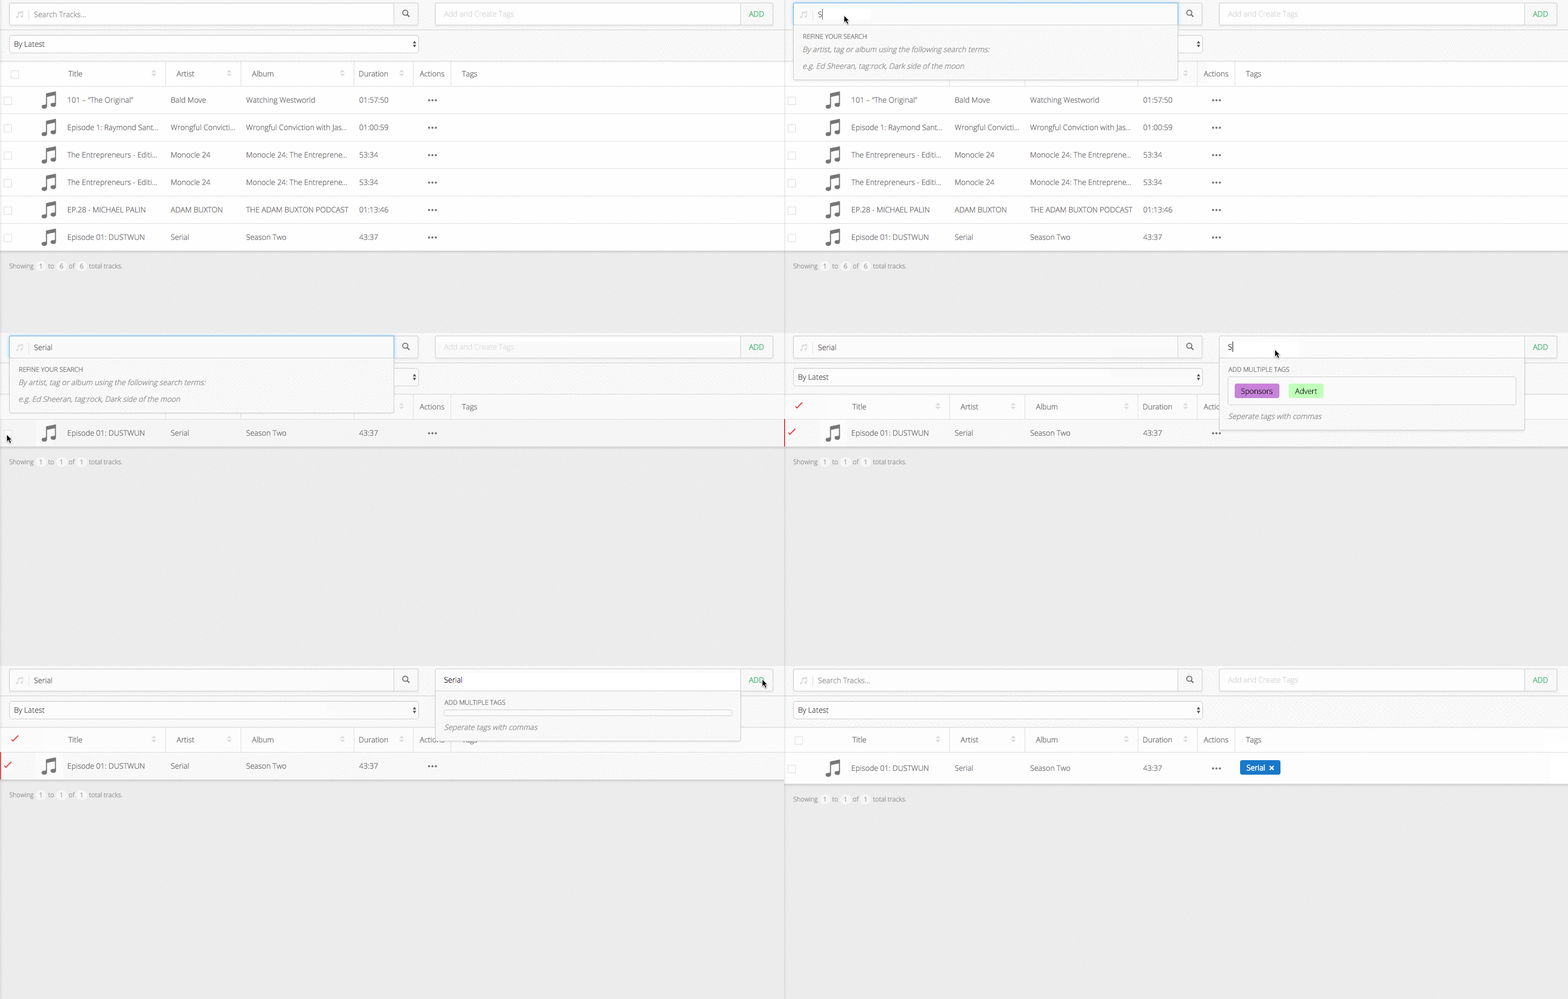
Tags are a perfect way of managing your media and organising your audio files into different categories, such as a list and b list tracks, jingles and adverts.
To get started, write the name of the audio files you want to tag and then select them. Then type the name of then tag you want to create and click add. Once a tag has been created it will automatically come up as a suggestion for you.
4. Build Your Playlists
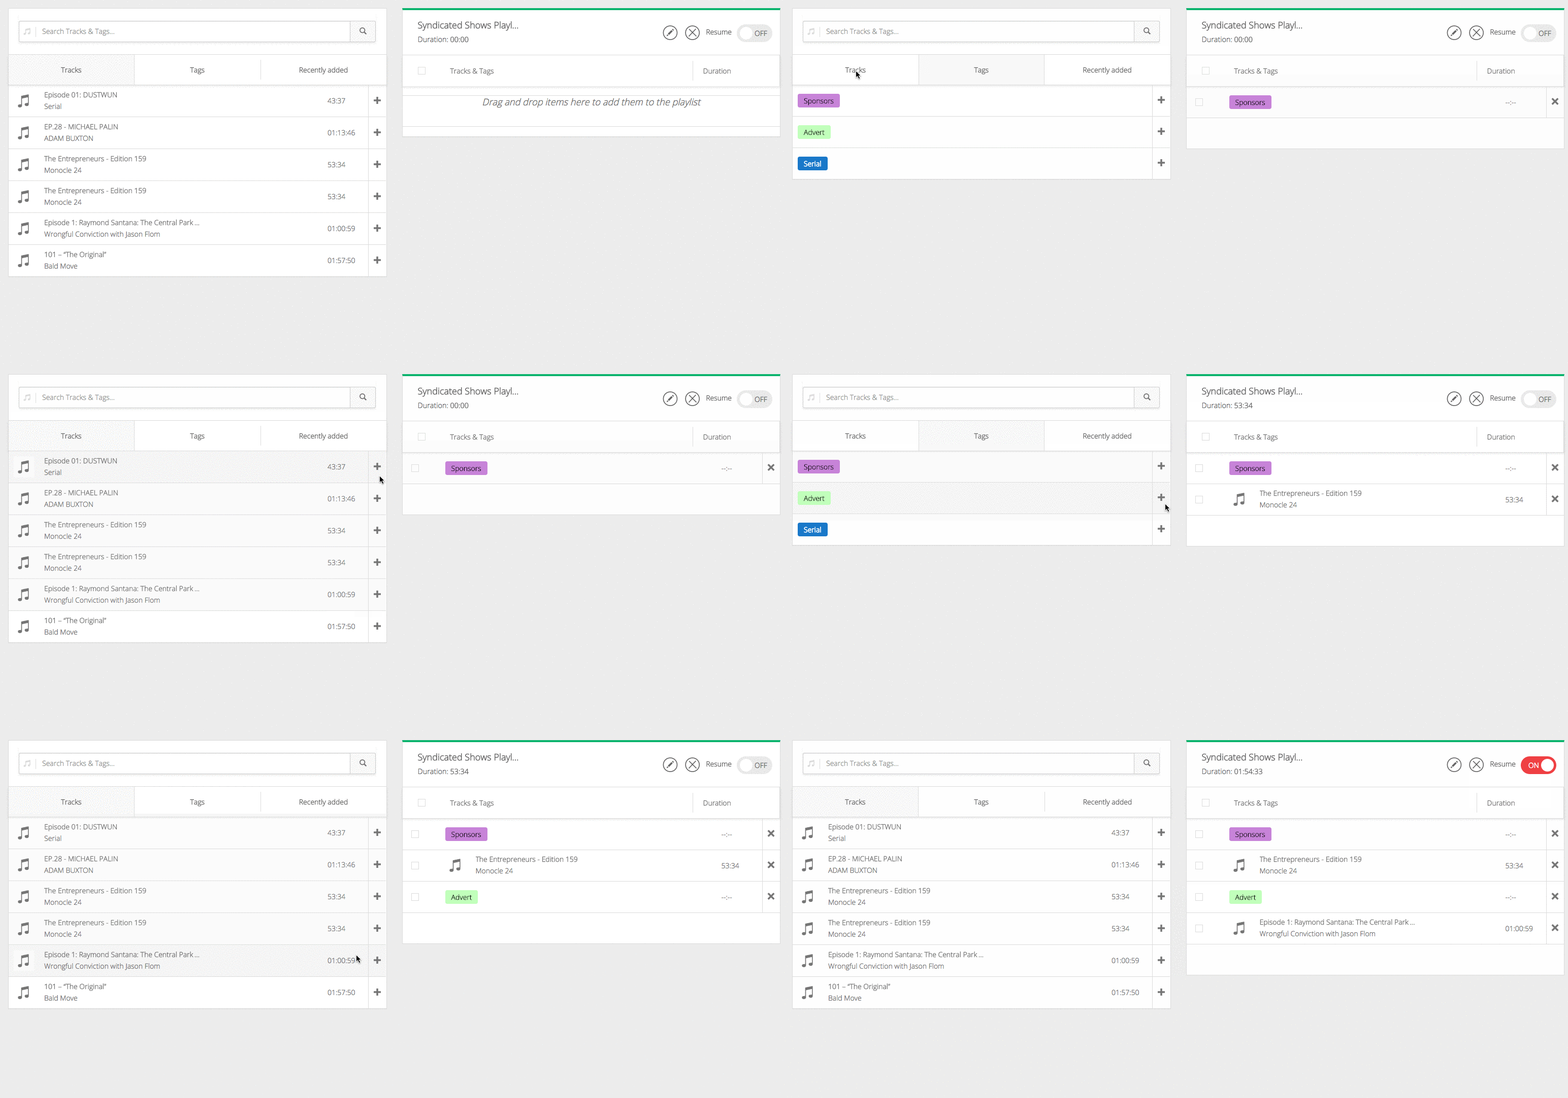
Once you have uploaded and organised your media files you can begin building your playlists.
You can make up playlists from tracks, tags or a combination of both. To add tracks and tags to your playlist just click the file you want to add and it will appear on the right-hand side.
5. Create Your Schedule
Once you have created your playlists the next step is to add them to your schedule. To do this simply click on the relevant time and date and then select the playlist your wish to schedule. Alternatively, you can set a live broadcast by selecting a DJ name from the drop down.
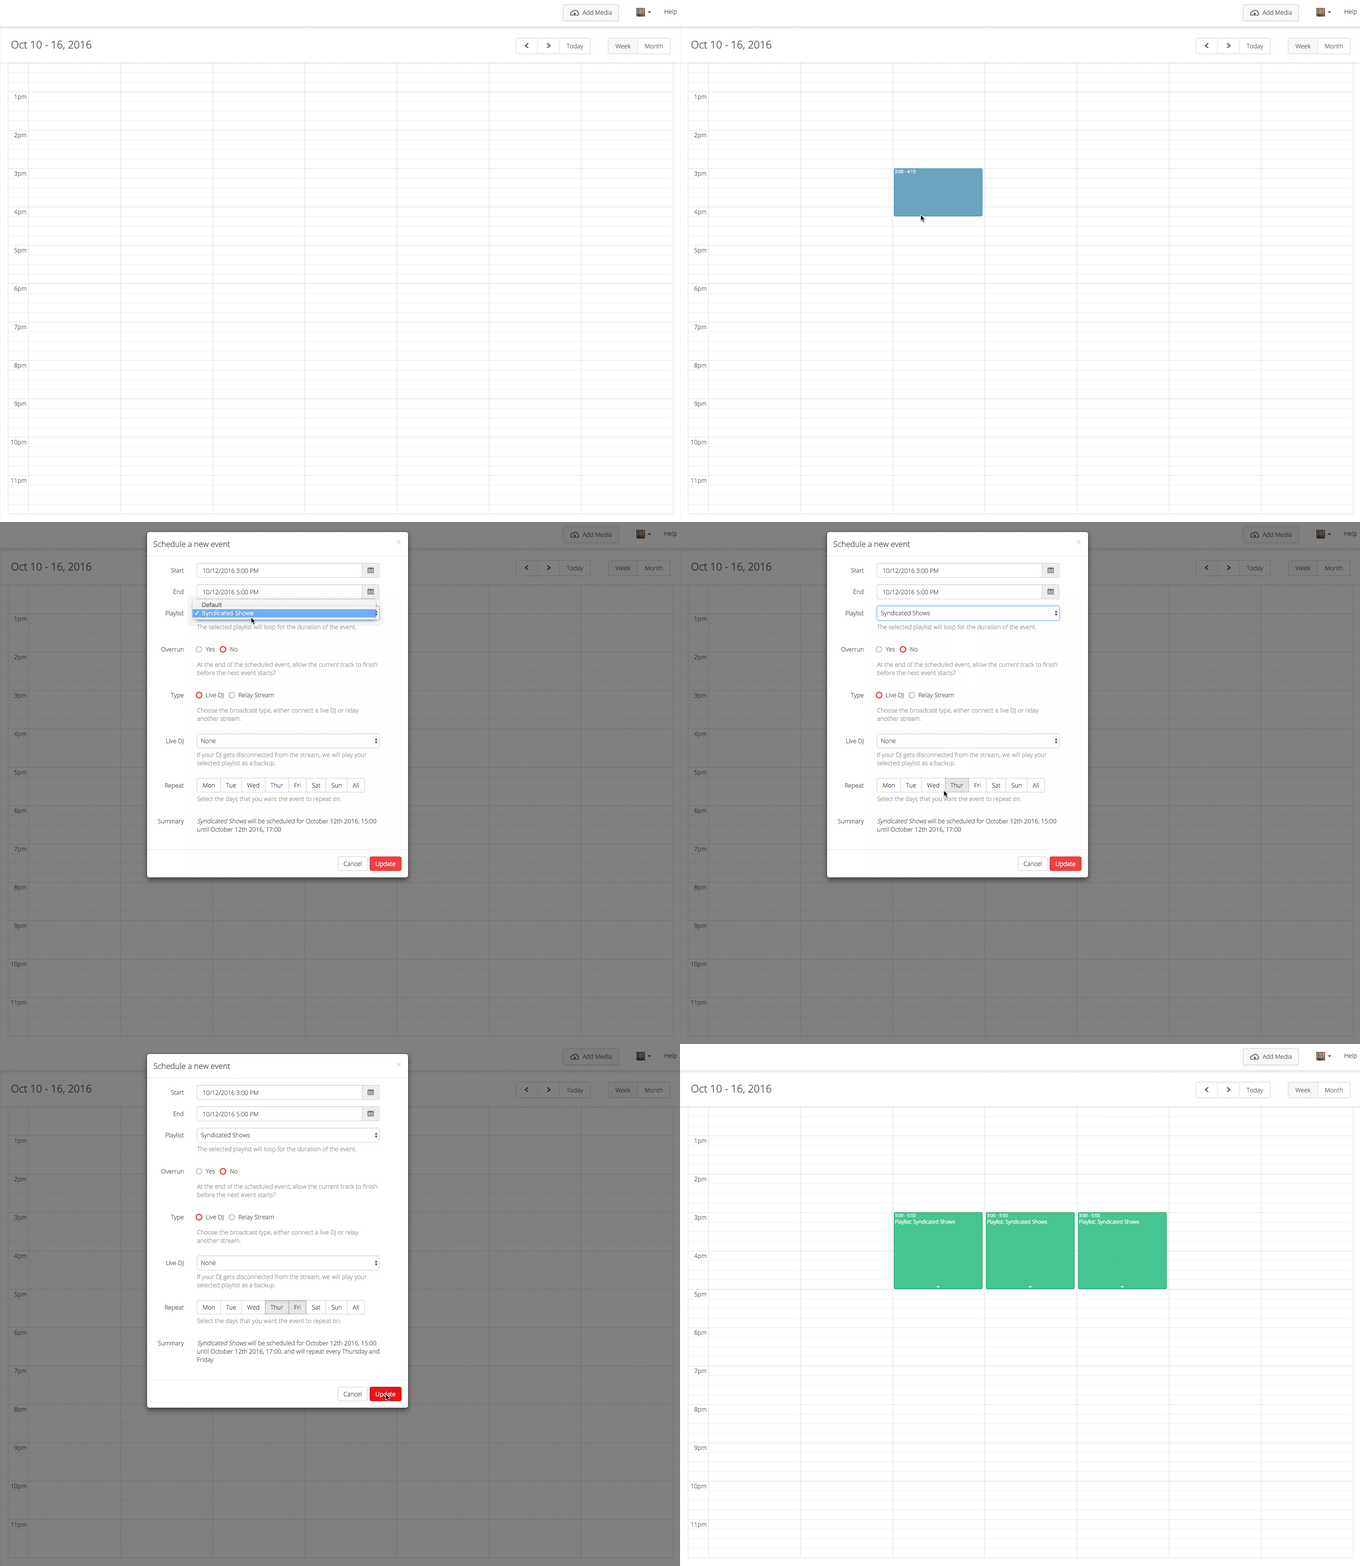
The schedule functions like a standard calendar you might use: to set up your event you just need to click the time you want the event to occur and, if needed, select the days that you want the playlist to repeat on.
6. Build Your Player
Of course, there’s no point in having a radio station unless your audience can easily tune in so the next step is to create your radio station's player.
Players come in three sizes and you can easily customise it to match your website or blog's branding. You can also choose whether to add social media sharing, as well as other options like auto-play.
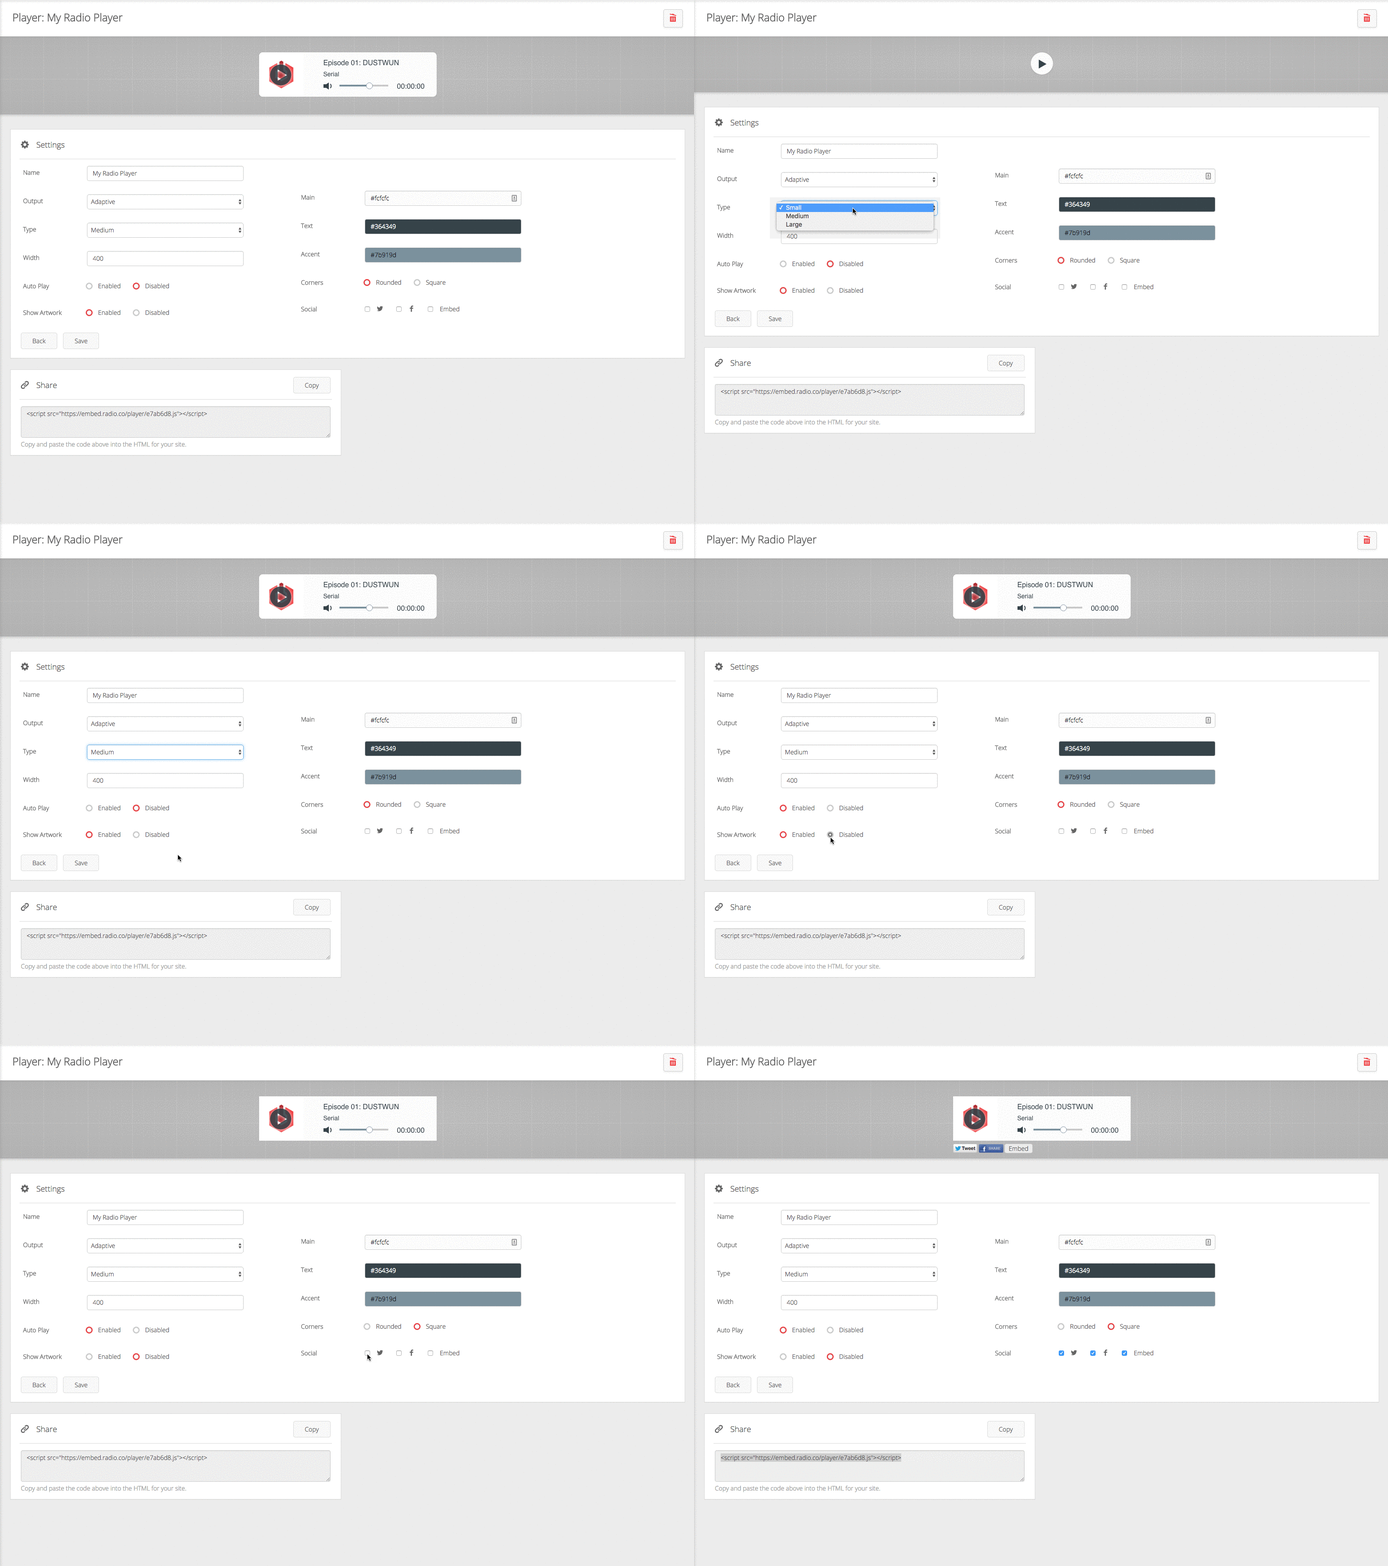
Once you have created your player you can copy the embed code at the bottom of the page and embed it directly into your website.
If you require more functionality or wish to create, for example, a persistent player which is constantly available over your entire website then check out our DIY Player. There are literally no limits to what you can do with the DIY player.
7. Connect Your Twitter Account
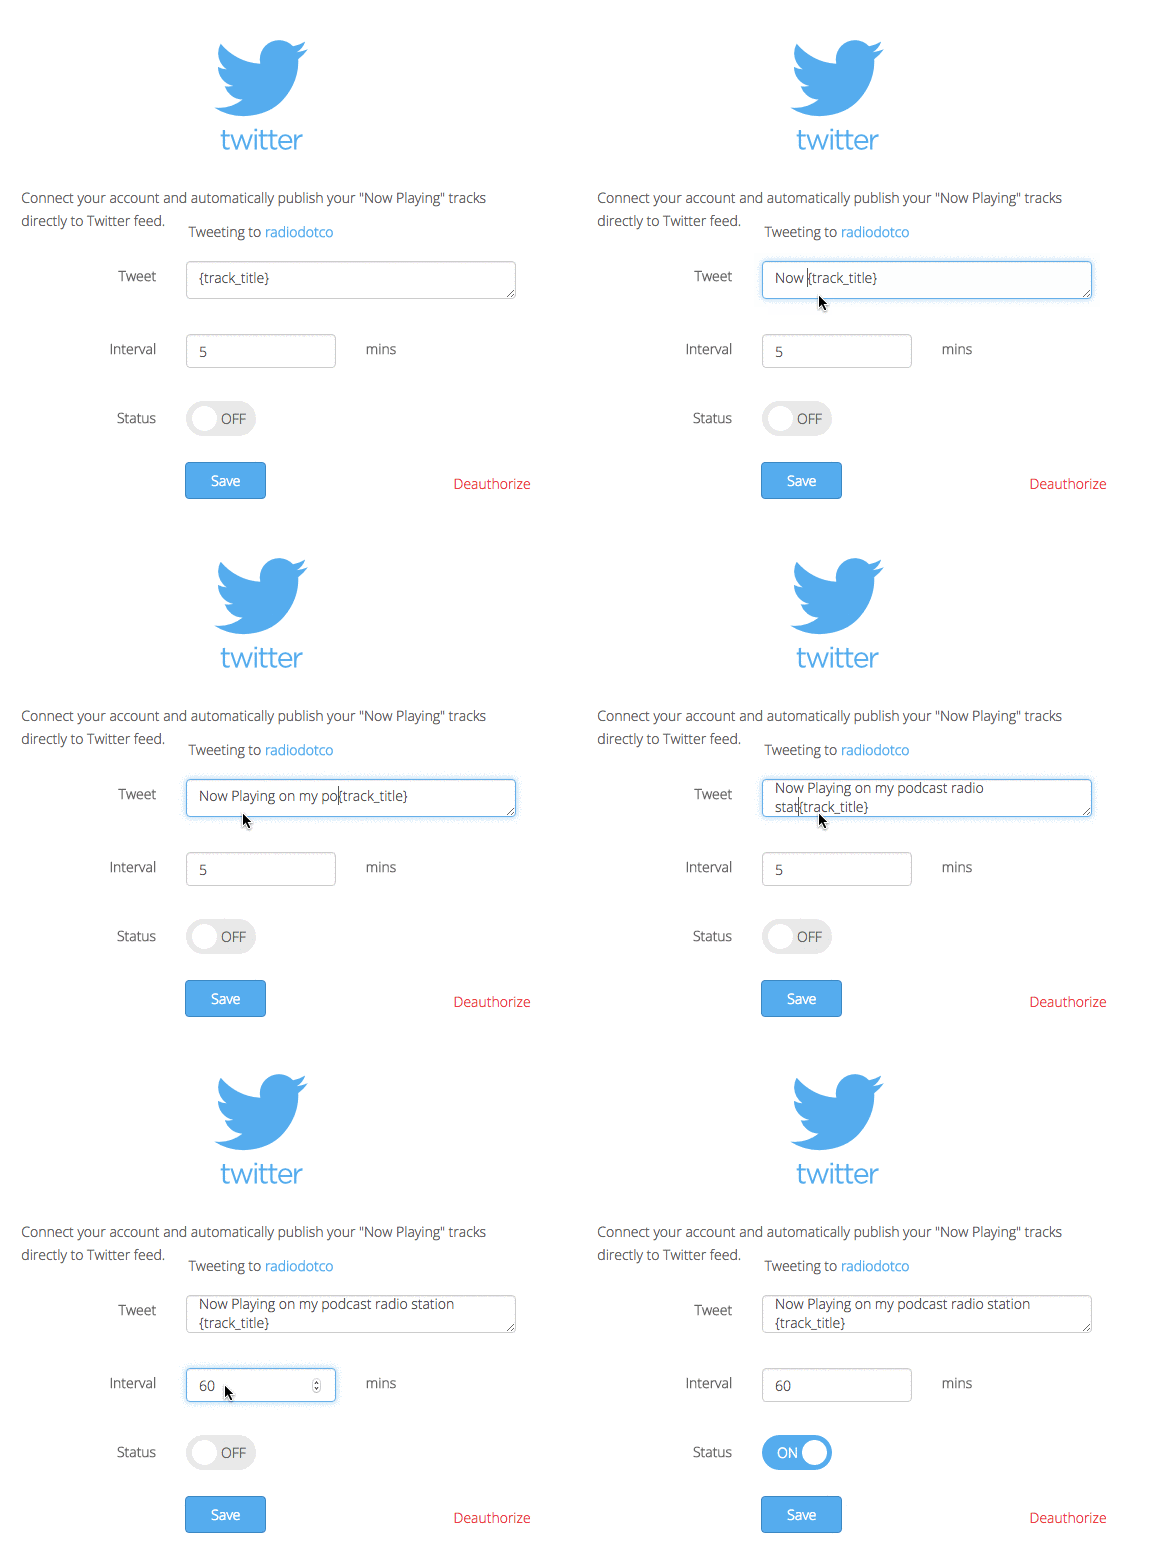
Lastly, we recommend connecting your Twitter account to enable you to automatically publish your currently playing information directly to your Twitter feed.
Picking the Right Equipment
Luckily, picking the right equipment and getting your studio setup can be achieved for a relatively low cost. In this section, we will cover three types of set ups.
The first is an entry level setup that is perfect to get your going, the second is a more advanced setup for interviewing guests, and then we’ll look at a professional set up with a call in facility, and multiple playback audio channels, all of which will be routed in through a mixing desk to give you complete control over your live broadcasts. If you are interested in Internet radio for magazines, blogs and publishers then these guides will be invaluable to you.
Basic Studio Guide
You’d be surprised at how little you need on how to make a radio station. As long as you have a good internet connection and a laptop or PC it’s possible to get your radio station up and running in minutes with radio.co. Our basic guide is a lightweight, portable setup which can be used in the studio or out in the field.
Microphone
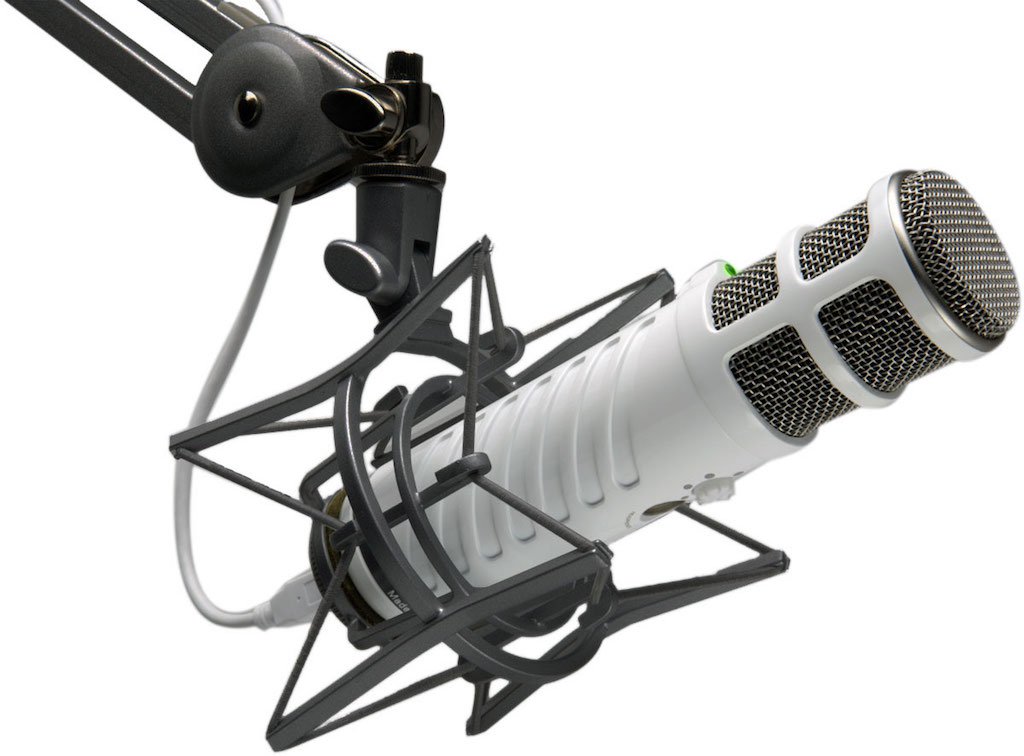
There’s 2 microphones we suggest for a basic set up, the Behringer B1 and the Rode Podcaster. The Behringer B1 is a reliable and cost effective condenser mic. It has a wide diaphragm for picking up every bit of audio.
However if background noise is a concern then try the Rode Podcaster as it’s excellent at noise reduction, however, it’s a little bit pricier. It can be found on Amazon UK and Amazon US.
Stand & Shockmount
Whilst you are recording out on the road the likelihood is that you’ll record most of your audio handheld. However, when you are recording or broadcasting live from a studio you will want to invest in a good stand and shock mount to hold your microphone and reduce vibrations, which will ensure high quality sounding audio.
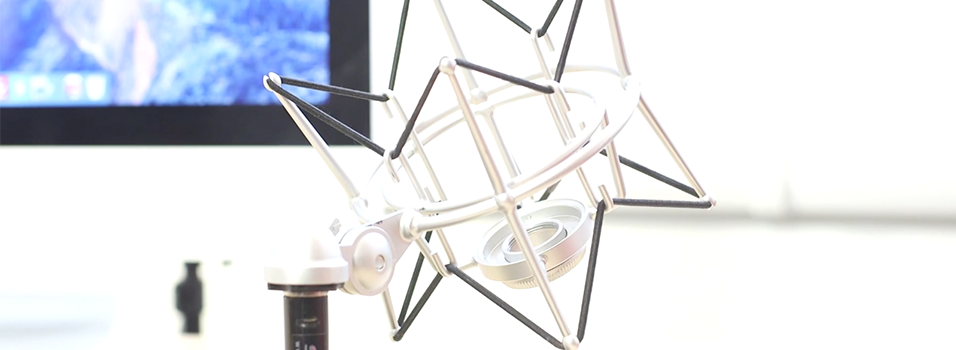
Most microphones don’t come with these, but you can usually get them for around $12 / £10.
Headphones
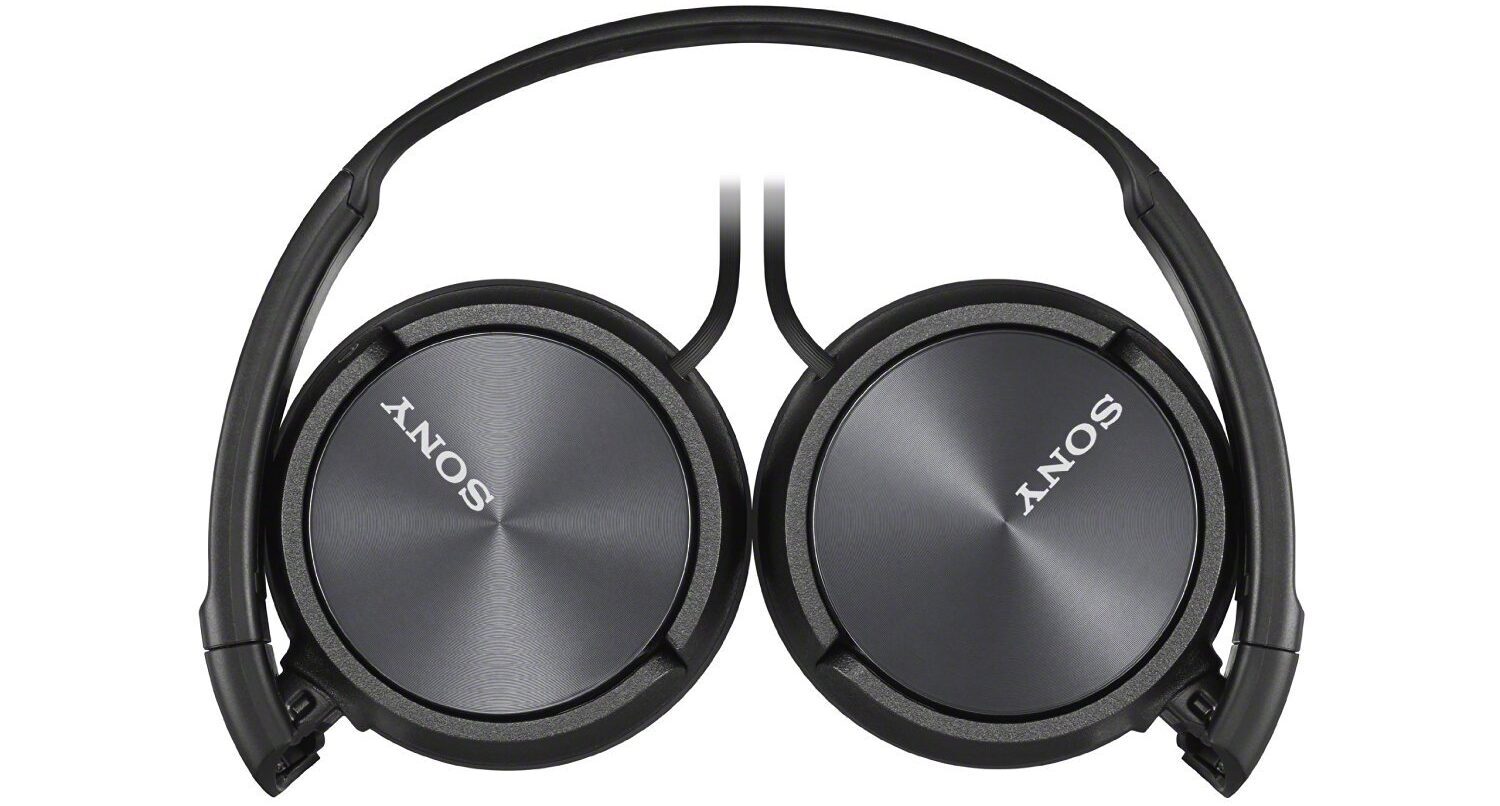
A pair of over the ear headphones like the Sony MDRZX310 is ideal as they’re lightweight and affordable. They can be bought on Amazon UK or Amazon US.
Advanced Studio Guide
If you are looking to set up an actual studio and want to bring and interview guests then you will a more professional setup. Our advanced studio guide is aimed at broadcasters who want a permanent studio but do not want to outlay too much cost initially.
Audio Interface
Condenser microphones, like the Behringer B1, need phantom power to run. One of the best entry level audio interfaces you can use is the Focusrite Scarlett 2i2.
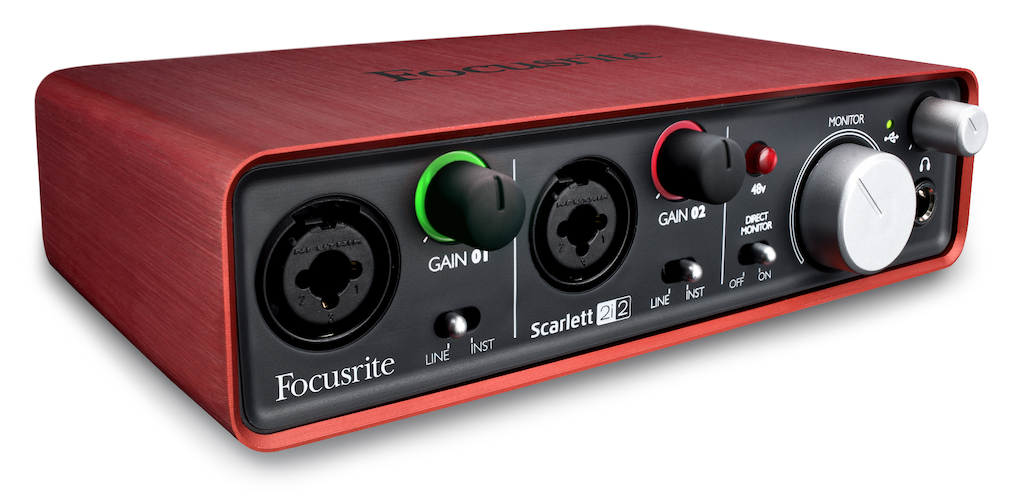
Plug up to 2 microphones for you and a guest, adjust your volume levels and monitor the audio through the interface. The Focusrite is available on Amazon US and Amazon UK. We have a full rundown of the how it works in this guide.
Microphone Processor
A microphone processor is a way to power your microphone, enhance your vocals and give your audio more resonance. The DBX 286S is a fantastic piece of equipment for enhancing your voice and creating professional sounding audio.

Processors such as this remove background noises and clean up audio, like removing harsh sounds like “S” which can often cause high frequency and often bad signals. The DBX is ideal in case you’re on a budget. You can get it on Amazon US or Amazon UK.
Read our full review and how to setup the DBX 286S in this guide.
Microphone
The Blue Spark is an advanced condenser microphone ideal for studio setups as it’s incredibly responsive and provides a great, warm sound.
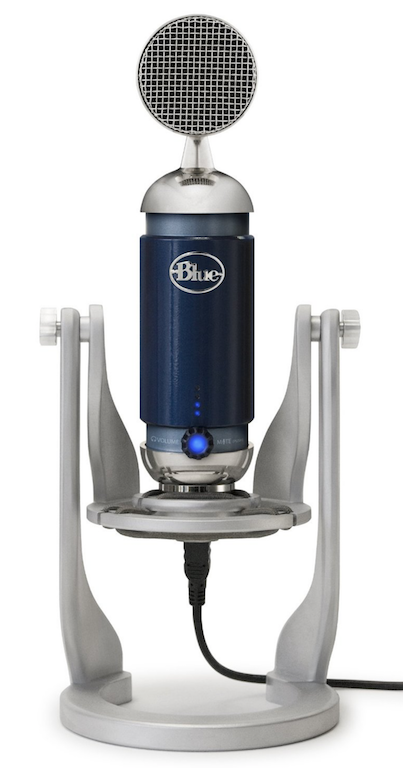
Like the Behringer B1, the Blue Spark is a condenser microphone which is great for recording ambient sound, so it’s perfect if you’ve got a guest on your show. You can pick the mic on Amazon US or Amazon UK with either an XLR or USB/lightning cable.
A range of the best 'advanced microphones' available can be found in this guide.
Professional Studio Guide
Whilst for most blogs, publishers and magazines our basic and advanced studio guides should suffice our professional studio guide highlights the equipment and setup used by most online radio stations.
Broadcasting Desk
A broadcasting desk is the hub of any radio station as it offers multiple input channels and controls for audio management. The Behringer DX2000USB is one of the best and is highly recommended by commercial stations and professional broadcasters alike.
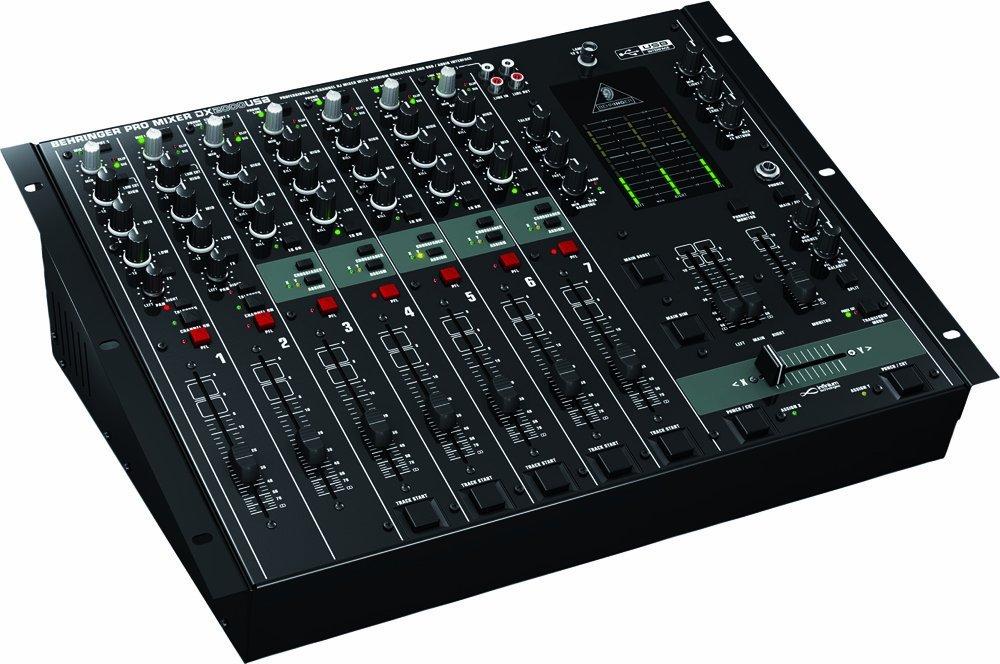
This low-cost desk is incredibly well suited to online radio stations. It has USB connectivity for connecting it to your computer and multiple inputs allow you to have different guests talking at once. It is available on Amazon US or Amazon UK.
If you would like further information on broadcasting desks the make sure you check out our best broadcasting desks guide here.
Boom Arm
A boom arm is an attachable crane for your microphone you can adjust from your desk to suit your position. It’s a must have for any radio professional as it gives you better flexibility.
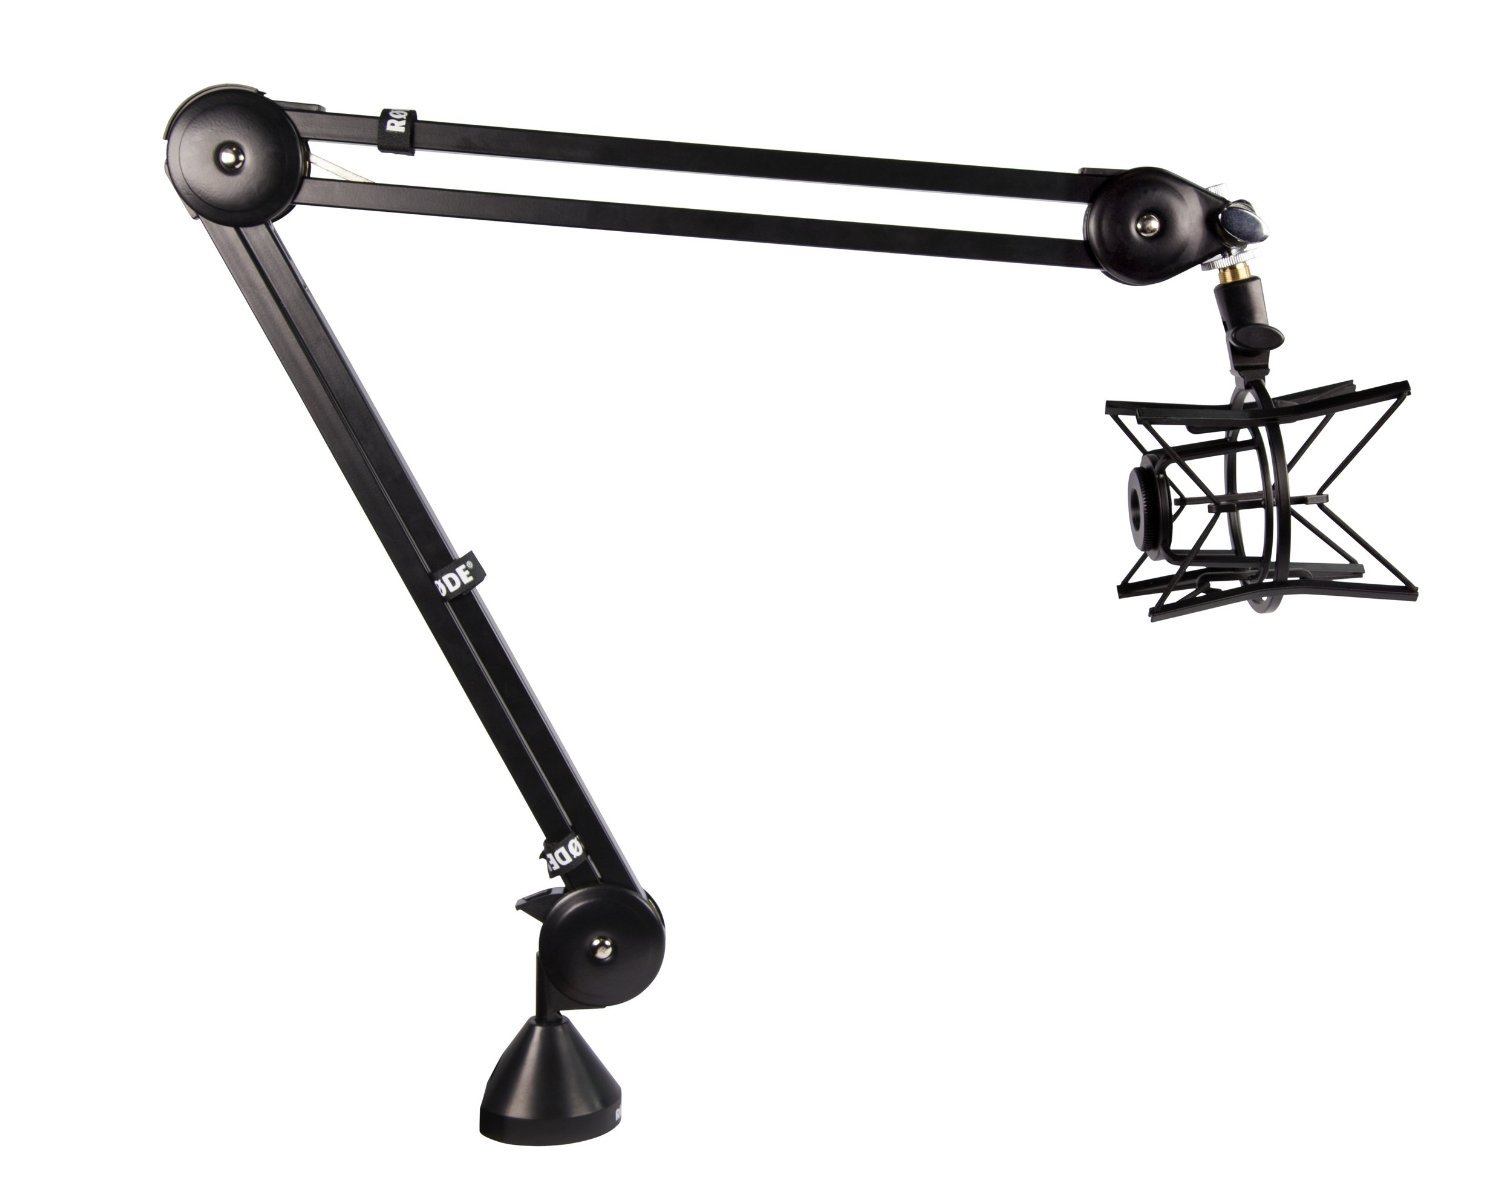
The Rode PSA1 boom arm is one of the best out there as it’s easy to place at the edge of your desk and has cable ties to clean up any messy wires. It can be found on Amazon UK or Amazon US. You can attach any microphone and shock mount to the end of the arm like the Neumann TLM 103.
Microphone
The Neumann TLM 103 is an industry standard microphone professionals use across the UK and USA. We highly recommend this microphone, in fact, we use it in our studio for our Internet Radio Podcast series.
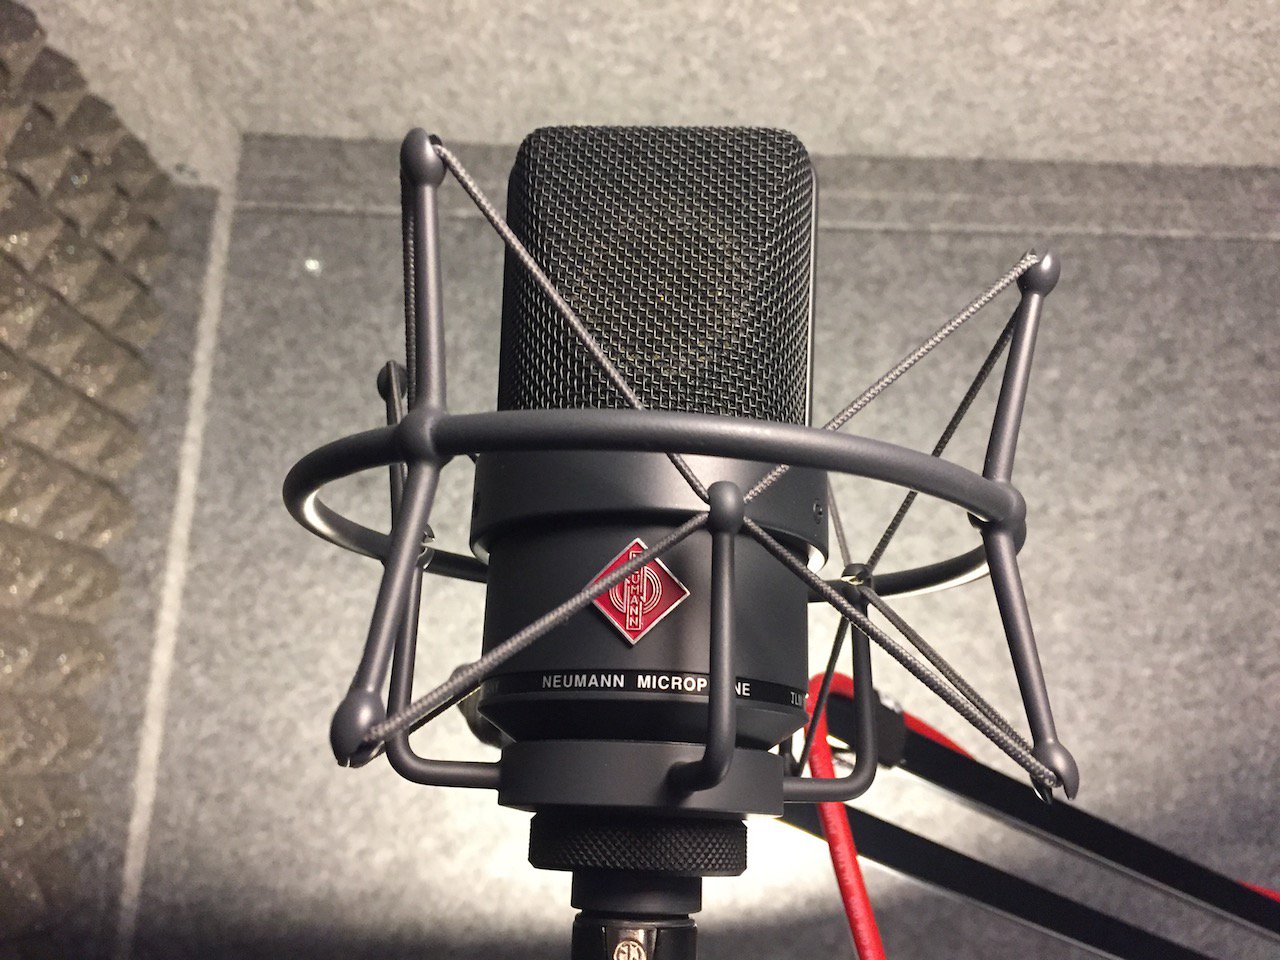
The TLM 103 is a sturdy microphone with a large diaphragm for picking up low noises and enhancing audio capture. The Neumann microphone can be bought on Amazon US or Amazon UK.
Radio Licensing Explained (& What it Means to You)
Unlike traditional radio (FM / AM), you don’t necessarily need a license to transmit a radio stream online, but it depends on multiple factors.
For instance, if you’re planning on using commercial music then you will need to pay royalties. If you do intend on playing commercial music on your radio station then it’s worth doing a bit of research because what you pay will depend on what music you actually play and where you broadcast to and from. Luckily, Radio.co contains all the reporting features you need to accurately report to whichever licensing body you end up going with.
However, if you intend to broadcast talk-based content then the likelihood is that you will not need a license. That being said, we always recommend consulting with qualified professionals or relevant authorities for your country regarding copyright and licensing.
In most instances the vast majority of blogs, magazines and publishers we work with broadcast a mixture of talk and music based content but keep their licensing costs relatively low by keeping the music the play to a minimum.
For a complete rundown of music, licensing, and royalties we recommend reading this guide.
Promoting Your Station
In this section, we are going to look at, what we believe to be the two best ways to promote your station and grow your listeners - TuneIn and Apple's App Store. The success of internet radio for magazines, blogs and publishers, depends on growing your listeners and apps are a great way to do this.
There are huge benefits to making your station available on both of these platforms. TuneIn is generally considered to be the go-to location for consuming radio online and the number of new listeners you can attract, simply by making sure potential listeners can access your station on there, is huge.
Likewise, if you are looking to use audio to grow your audience then creating a dedicated mobile app and having a presence on App Store is a must, especially as The App Store itself has over 300 million visits per week.
Adding your Radio Station to TuneIn.com
To add your radio station to TuneIn.com and get listed in their directory you need to fill out this form.
Radio stations submitted through the online form need to be accurate, so it's important that your details are correct to avoid it being rejected.
Fill out your station's basic information:
- Station Name: MCR.LIVE
- Email: hello@mcr.live
- Website (Optional): http://www.mcr.live/
- Stream URL: http://stream.radio.co/s7ee52d...
Find your stream URL in your Radio.co Dashboard in the Listen area under Streaming Links. TuneIn.com accepts Radio.co stations, however, if your URL is not accepted then follow this guide.
If your station isn’t active 24 hours a day, add in the comments section at the end the days and times it will be live, e.g. Sat & Sun between 9 am to 5 pm (GMT).
Add your radio station's broadcast information so listeners can find you:
- Internet Only OR AM/FM/TC: Internet Only
- Country: United Kingdom
- Language: English
- Formats: Indie, Pop, Rock
- Logo: (1200x1200 pixels in either PNG, JPG, or GIF format)
- Station Contact Email: hello@mcr.live
- Twitter: mcrislive
- Phone: (+1) 650 238 9055
- Slogan: Manchester is Live
- Description: A dynamic radio station for Manchester that showcases the best music and culture from the city centre.
Your logo should be 1200x1200 pixels:
Avoid using ALL CAPS in your station name, slogan, and description. Proof-read spelling before submitting to avoid mistakes and the use of offensive language as your station will be rejected otherwise.
After submitting your station to TuneIn.com they will send you a confirmation email when it has been added to their directory, this usually takes 48 hours, however, if you don’t hear anything back drop them a message to look into your submission: broadcaster-support@tunein.com.
Updating Your Radio Station
Once your radio station is listed in TuneIn you can make changes. On your station's profile page click "Suggest an Update", it will take you to a form with your information. Update your details within the form and submit.
Connecting Radio.co to TuneIn.com
Radio.co includes support for TuneIn’s AIR API, which allows your track information to automatically update to your TuneIn profile so listeners know exactly what you’re broadcasting.
In your Radio.co Dashboard, navigate to Settings and then Integrations to input your details.
- Station ID: s211838
- Partner ID: gHbra2Go
- Partner Key: 821QO1RPXJGL
Request your TuneIn information by emailing broadcaster-support@tunein.com with the subject "Station API & Partner Key Request" and provide your Station ID.
Locate your Station ID on tunein.com - search for your station, open your station's profile page, and copy the last set of digits - for example, "tunein.com/radio/Fringe-SF-s211838", the Station ID would be: "s211838".
TuneIn.com support should get back to you within 24 hours with your Partner ID and Partner Key so you can connect Radio.co to TuneIn.com.
Creating Your Radio Station App
Whilst apps that display your station, like TuneIn, are great for building your audience they don’t have the same feel to them as your own app would. Plus there’s the fact it takes a lot longer for listeners to navigate to access your stream (plus there’s also inserted ads to contend with).
Your custom radio app is designed, branded, and offers an intuitive experience for listeners to access your stream with just a tap of a button.
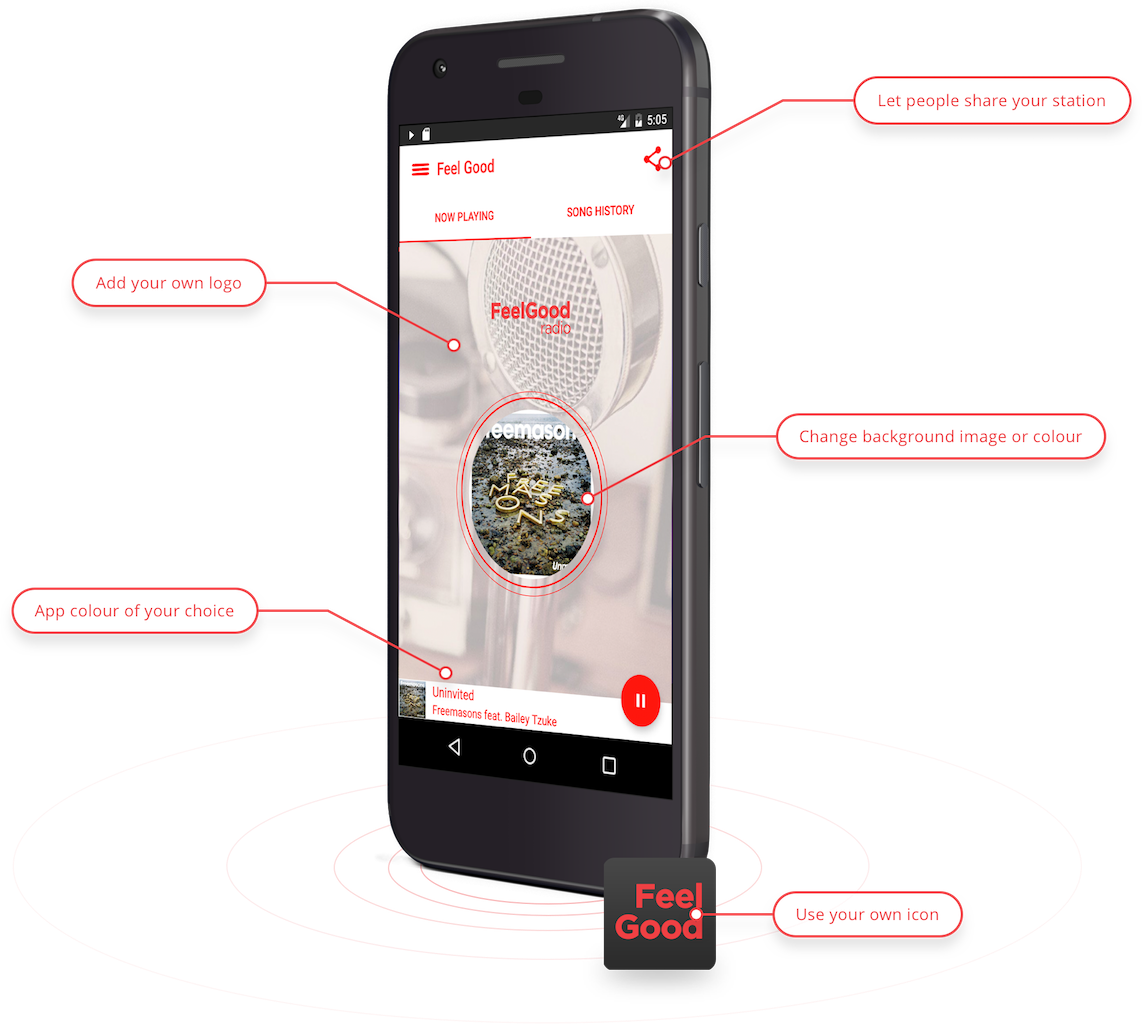
Give your listeners a piece of your station that they can take with them. Hundreds of thousands of listeners can download and carry your app in their pocket, wherever they go.
A lot of work goes in to make a radio app, but Radio.co simplifies everything. We take your designs, build it ourselves, and even submit it to the stores. Here’s a brief overview of what goes into crafting your app.
Setting Up Your App Developer Accounts
Before our dedicated team of mobile app developers can get to work, they need a few things from you first. One of which is a developer account.
Both Apple and Google require all apps be submitted through developer accounts. Start your enrollment for either account by clicking the links below.
Once your account has been setup and your app’s ready to go live we can take over. Your app will be submitted through your account so it’s branded to you or your station.
Ordering Your Apps
If you’re already with Radio.co you can order your apps for both iPhone or Android in the Radio.co Dashboard under the Add-Ons section.
Alternatively, if you’re new to Radio.co then you can grab your apps on checkout by selecting a plan here.
Designing & Submitting Your Details
In the App Builder you can design the look and feel of your app. Go through the steps indicated on screen to submit your details.

Make sure your station’s brand and messaging are correct, so things like colours, logos, and artwork all match your radio station. Finally, submit your app to the mobile development team – They will be in touch within 48 hours to confirm everything is on track.
Once your app has been approved you will be able to direct your users to it and take advantage of the huge amounts of traffic that's on The App Store.
Taking Your Station's Content Further
Since 2013 podcasting consumption has increased massively and in 2016 1 in 4 Americans aged 12 - 55 listen to an average of 3 podcasts per week! Internet radio for magazines, blogs and publishers is a great way of growing your audience and you can maximise on this by making your radio content available as a podcast.
So what’s driving this huge shift in podcast consumption? As you might expect the big thing, like with so many industries, is mobile. So much so that almost 65% of podcasts are listened to on a mobile phone or tablet, so there has never been a better opportunity to connect with potential listeners, whether they are commuting, in the gym or at work.
Plus if you are producing content for your station it only takes a few more steps to then turn your shows into a podcast. The great thing about this is that you can discover even more listeners and give your broadcasts a much longer shelf life. In this section, we are going to at how you can use Radio.co to record your live broadcasts and make them available to your audience.
Recording Your Shows
With Radio.co you have the ability to set your live broadcasts to record. These recorded broadcasts can then be uploaded to your favourite podcast platform.
Recording your broadcasts in Radio.co is as simple as following these simple steps:
- Click on your schedule.
- Setup a live event on a date and time.
- After broadcasting access your recordings in your media library in the Recordings tab.
You can then choose to reschedule your recording so listeners who may have missed the original broadcast can hear it. Alternatively, you can upload your recordings to popular platforms like Mixcloud and connect with their audiences.
Monetising Your Radio Station
Of course, if you are looking to set up a radio station for your magazine or blog then not only do you want to grow your audience but you’ll probably want to try monetising your station as well.
Generally, stations don’t just rely on one way to earn cash. There’s actually several different business models you can follow. Primarily it falls down to 2 types: advertisements and sponsorships.
The advertisement model is one that’s tried and tested – Companies give you money for air-time. Small sound bites like commercials or jingles often get played in between tracks. It’s a simple and effective way to grab the listener’s attention.
Here in the UK stations using this model fall under the Global and Bauer companies. Both are huge and own a vast majority of terrestrial stations that ripple out to both digital and online. On the last count, it’s 34 stations for Bauer and 10 for Global, all of which primarily earn money from ad revenue.
These stations often promote big advertising agencies, pulling in large amounts of cash. How much cash they make and what’s played by advertisers depends on the listeners. It usually falls down to:
- Number of Listeners.
- Age Range.
- Average Type of Listener.
Advertisers need to know who they’re talking to and how many before they can talk cash. Often one-on-one deals are struck based on this, however, details are ironed out by radio stations and advertisers themselves.
The second model and more subtle way of advertising is through sponsorships – Companies pay to sponsor shows that are aimed at their target demographic. The way it works is the show’s presenter mentions the sponsorship, usually at the start and end, endorsing the company or service.
Going back to UK stations, for example, there are shows like Absolute Radio that use this model. Not only do the presenters mention the sponsorship, they also showcase it on other places like their website.
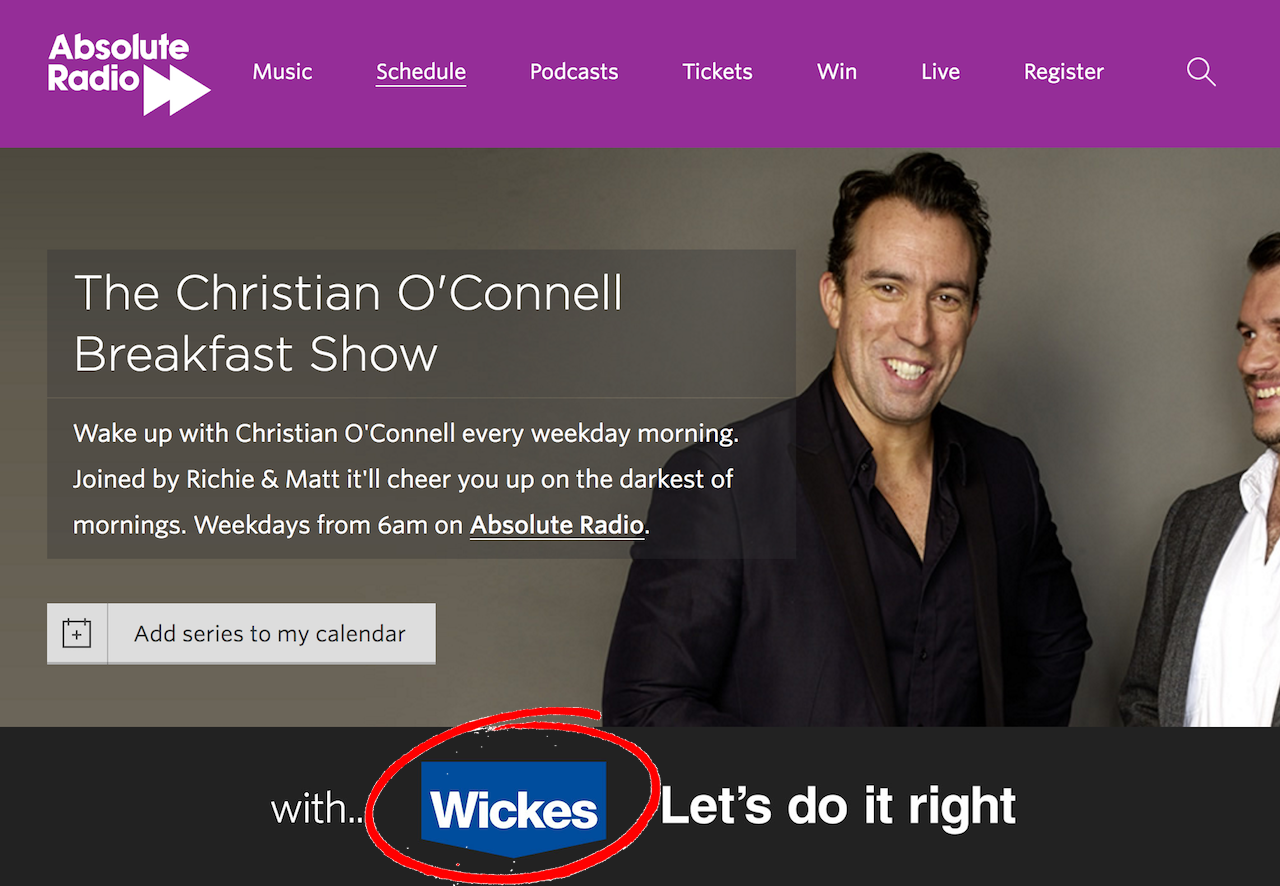
Why companies go with their selected stations relates back to the advertisement model. It depends on the average type of listener and the total number of listeners.
Starting Your Own Radio Station
So what are you waiting for? Start your radio station today. But don’t take our word for it. See how we’ve helped different types of broadcasters from hobbyists, entrepreneurs, and veterans get on air here. Get up and broadcasting now by starting your 7-day free trial by clicking the button below.


