Need advice? Let's talk.
Get straightforward guidance from your broadcasting partner. Schedule a call to chat with the team about your radio station.
Book DemoBeginners Guide to Live Shows Using a Mixer
Scratching your head trying to figure out how to do live shows using a mixer? You're not alone! Learn the basics and use your mixer to craft compelling radio.

You don’t have to be a tech geek to start your own radio station, but it definitely helps. For many new broadcasters, this will be their first time hosting live shows using a mixer. There’s no need to worry, though, it’s not hard to wrap your head around. Sure up your knowledge and learn how to navigate a mixer to create engaging live shows.
Learn to Host Live Shows Using a Mixer
Get ready to forge the heart of your station. Knowing how to present live shows using a mixer is an incredibly versatile skill any beginner broadcasters should learn. The number of knobs, dials and inputs can look daunting at first glance, but by following this guide, you’ll be a pro in no time!
Connecting your Mixer to your Computer
For the examples in this article, we’re using the Behringer 802 XENYX, due to its accessible price and great quality. If anything we mention doesn’t apply to the Behringer, we’ll be sure to make that clear.
If you're interested in seeing what other mixers are on the market, check out our article on the best broadcasting desks.
USB
If you purchase the Behringer XENYX 802USB, or a similar USB mixer, connecting to your computer simply requires the use of a USB printer cable into the USB port of your computer or laptop. If your device doesn’t have normal USB ports, like recent Macbooks, you may have to purchase a USB-C to USB adapter to connect this properly.
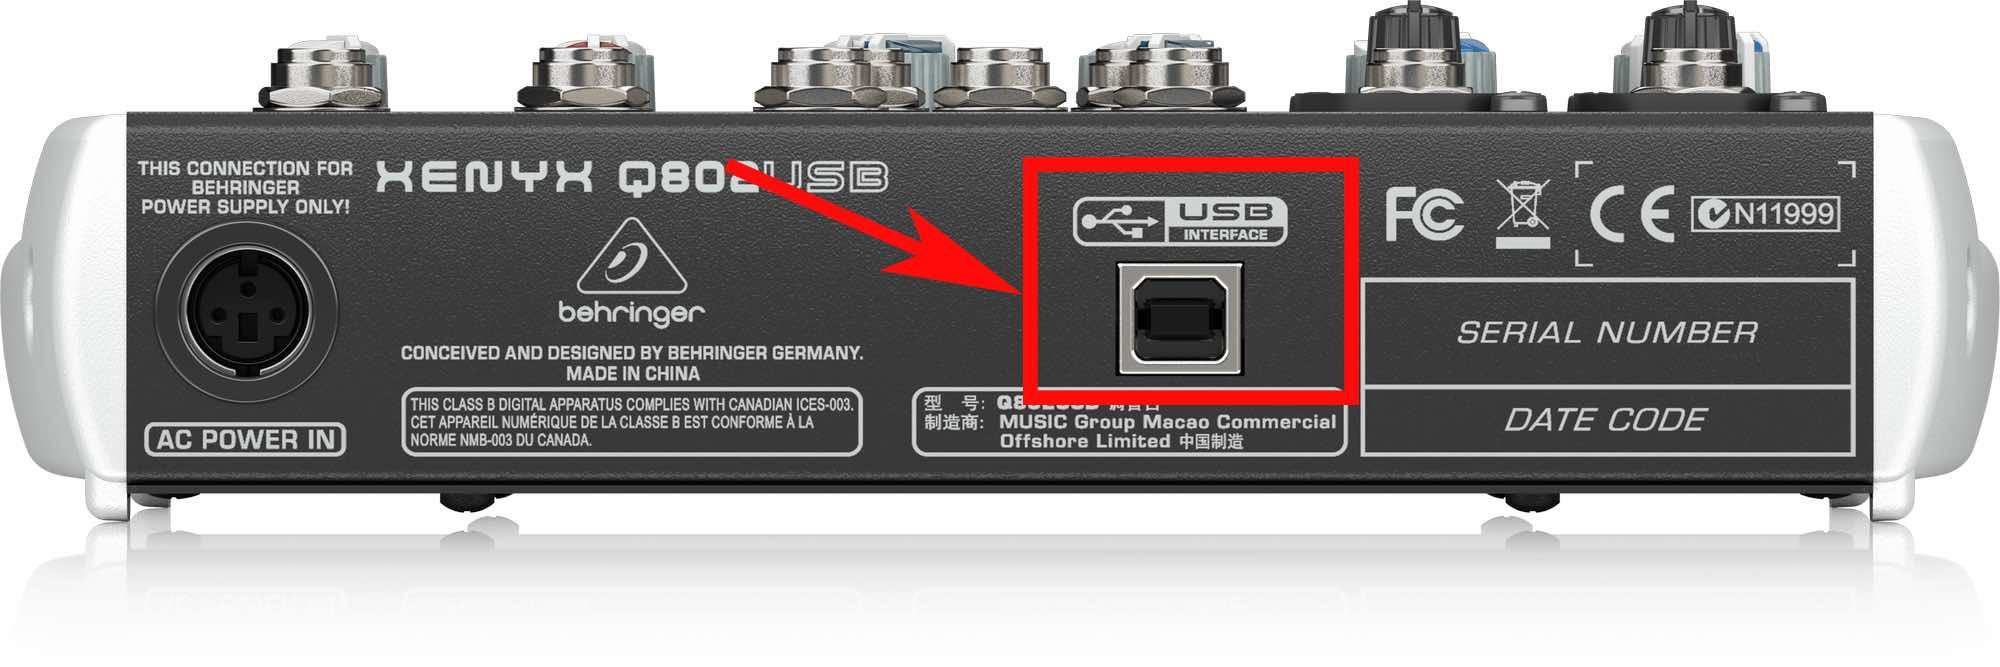
Once you’ve plugged it in, go into your system settings and check that your audio inputs and outputs are set to the mixer. Now you’re receiving a signal, you’re all set to host your live shows using a mixer.
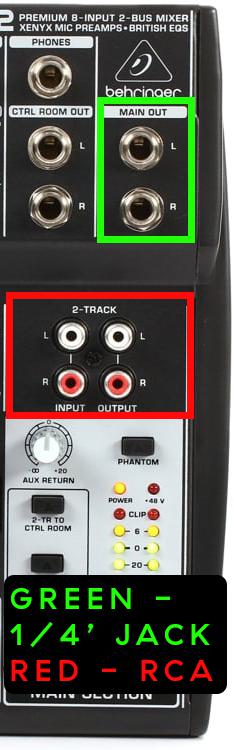
RCA and ¼’ Jack
These two solutions go together as they both set up the same way and provide a stereo connection to your computer, they just require different cables to work.
You will either need an RCA to ⅛’ jack or dual ¼’ jack to ⅛’ jack cable to connect this way. Depending on whether your computer has a microphone input or not, you may also need to invest in a USB soundcard, which you’ll need to plug into the USB input on your computer.
Once you have the cables you need, simply insert the RCA cables into the matching outputs on the mixer, and then plug the other end of the cable into your microphone input. On the Behringer XENYX series, the RCA outs are clearly labelled as ‘2 Track/Output’. Make sure your computer has the mixer as its audio device and you’re pretty much ready to present live shows using a mixer.
The process is the same if you’re connecting using the ¼’ jack inputs, the only difference is that you plug your ¼’ jacks into the stereo outputs rather than into RCA outputs.
XLR
If your mixer has an XLR output you can connect to your computer with either an XLR to ⅛’ jack cable or XLR to USB cable, depending on how you want it to connect. Besides that, it’s the same as the previous connections, except it provides a mono audio feed, rather than stereo, like RCA or jack inputs.
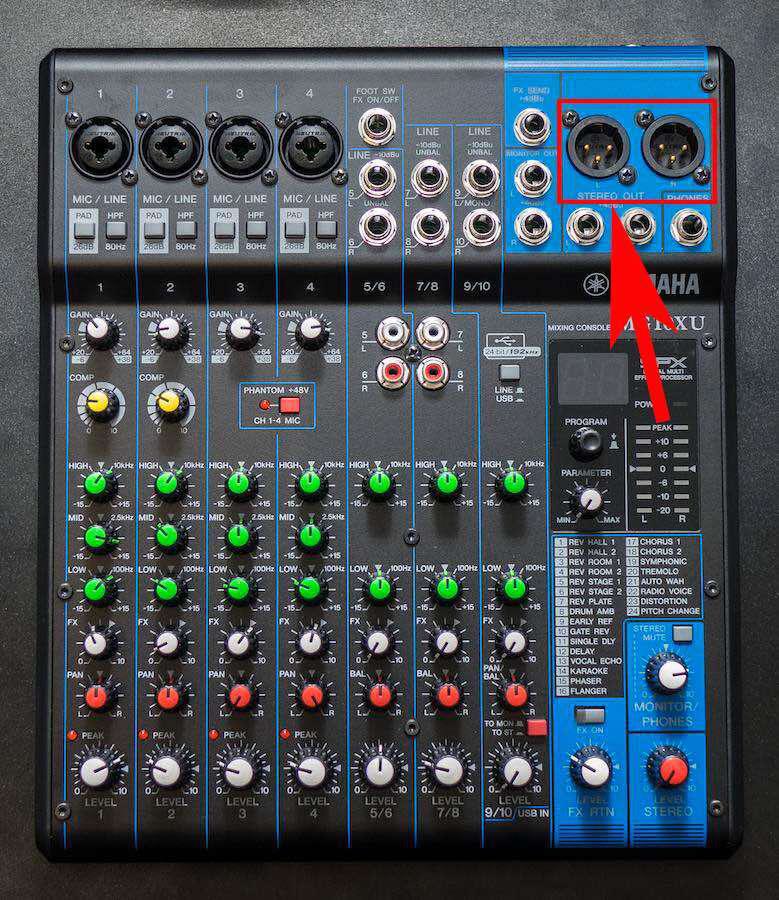
The Behringer 802 doesn't have XLR outputs, so we've used the Yamaha MG10XU as an example.
Now you’re connected, it’s time to wrap your head around using a mixer to craft engaging live shows.
How to Use Your Mixer
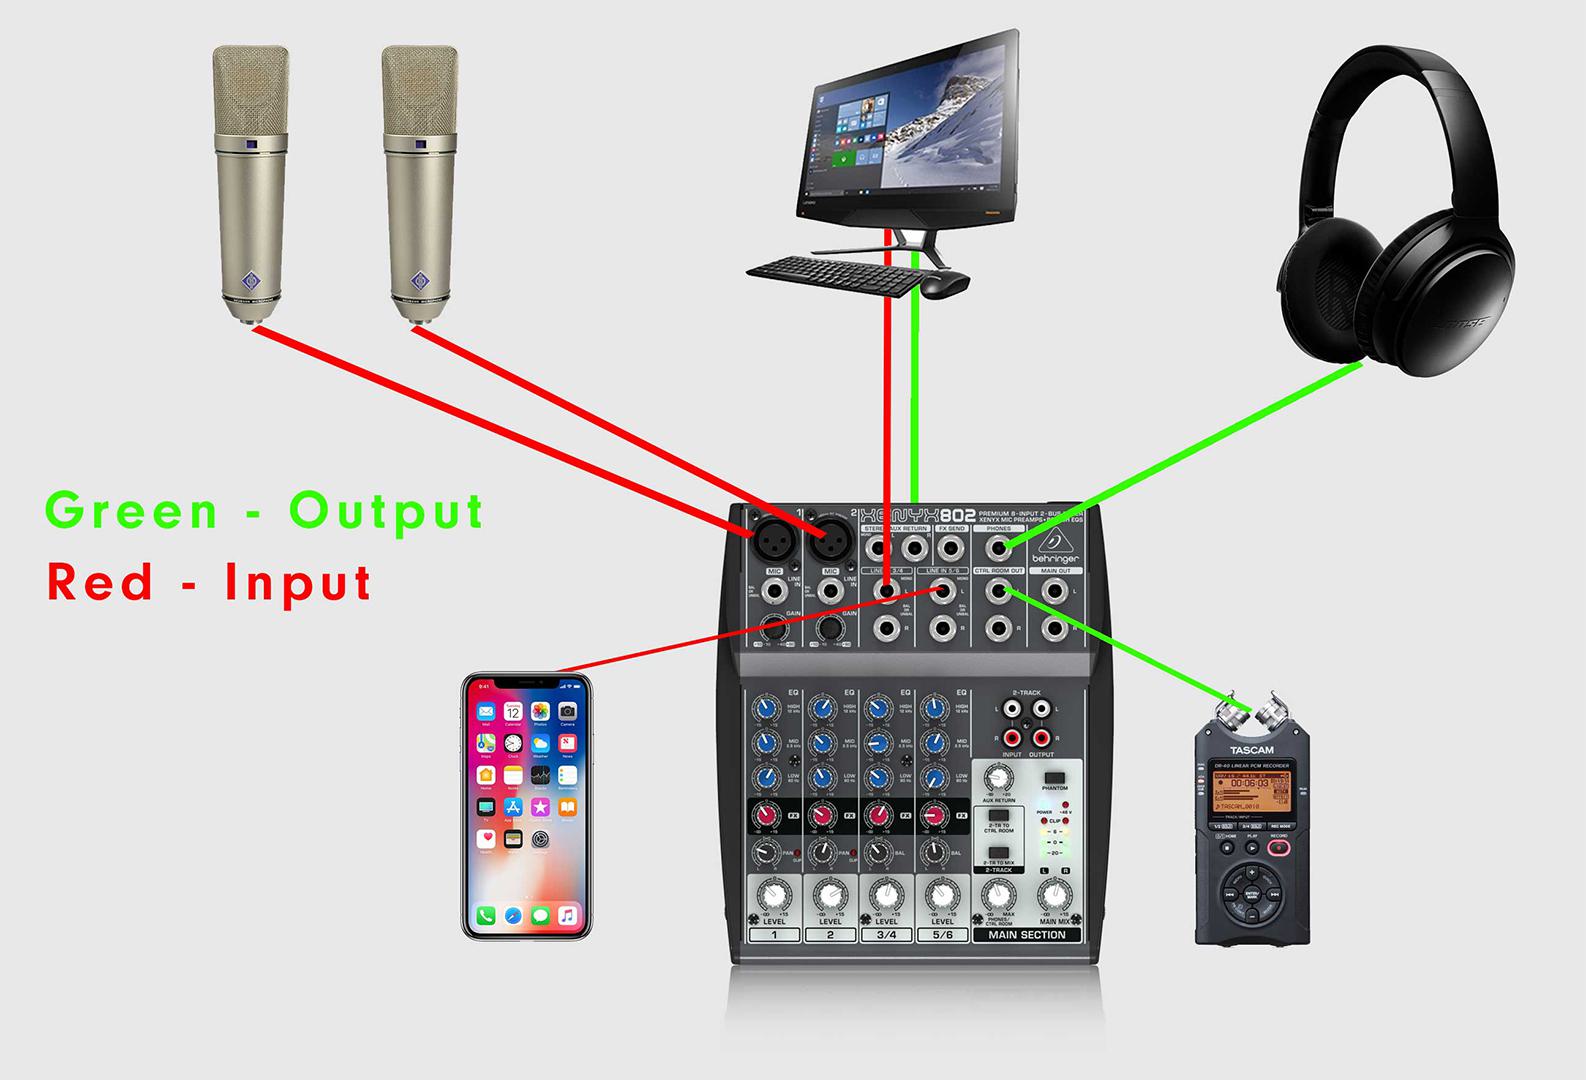
First thing’s first, you need to understand where everything plugs into your mixer. We’ll be focusing on its uses for radio, mainly looking at where to plug in your headphones and microphone, as well as make changes to your levels and effects on the fly.
Microphone
The majority of microphones out there use XLR connection, and on your mixer, you’ll find XLR inputs labelled 1, 2, etc. These numbers refer to the channel this input sends a signal to.
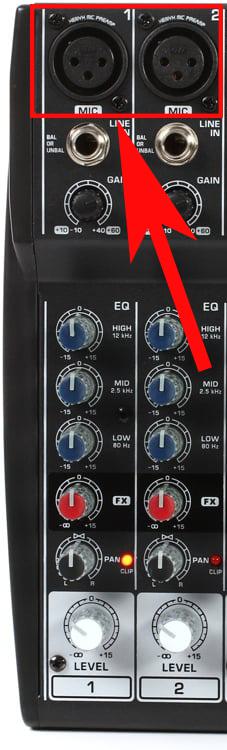
Once plugged in, use your faders to get a good level for the signal, but make sure not to let it get into the red and distort.
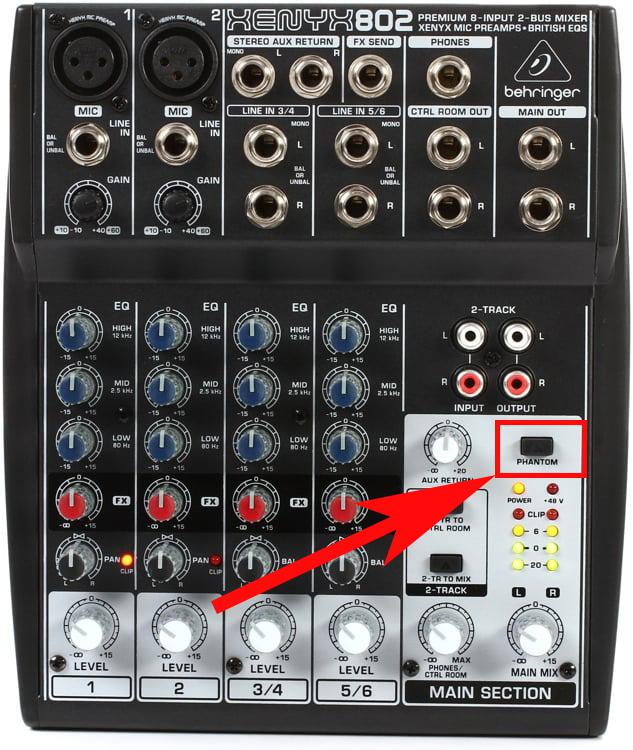
If you’re using a condenser microphone like the Neumann TLM you’ll need 48v phantom power to get a line level. Happily, mixers come equipped with Phantom power to accommodate this.
Headphones
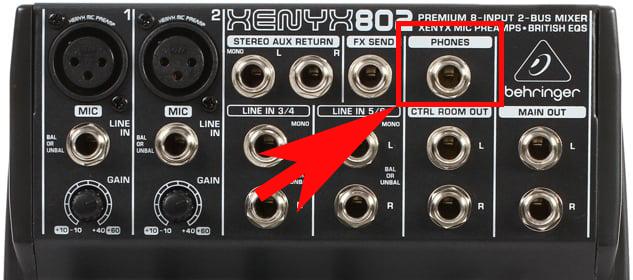
Look for the ¼’ jack input on your mixer labelled Phones or Headphones and plug yours in. If your headphones have a ⅛’ jack you’ll need to purchase a ¼’ to ⅛’ jack adapter.
Once plugged in, use the corresponding Phones volume fader to adjust your headphone volume to a comfortable broadcasting level. This will not affect the volume of your broadcasts.
Channels
We mentioned channels earlier, which you may not be familiar with. Basically, a channel is a strip on the mixer containing dials and faders, where you can single out and adjust one of your inputs without affecting the rest of your audio. Essentially, if you’ve got a microphone plugged into input 1 then channel 1 is where you can adjust the volume and effects for that microphone.

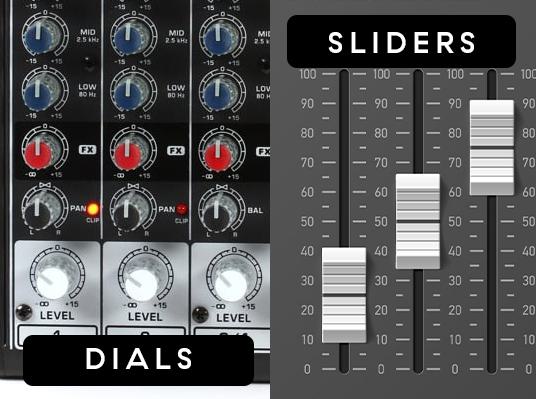
Faders
On mixers, faders are either a dial that you can turn left and right or a slider which you can move up and down. These are super simple to use and adjust the signal gain. Be careful about turning the gain up too high, if you crank it into the red you’ll get unwanted distortion. Use faders to get your levels exactly how you want.
Faders are also useful for creating smooth transitions from one channel to another. If you ever have music playing through one channel and want to fade to audio coming from another channel, adjust the faders of both channels at the same time to create sleek transitions that will keep your audience engaged.
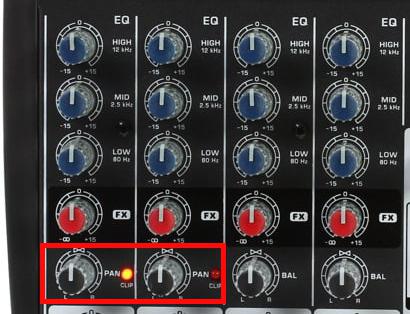
Pan
On most mixers, you’ll find a Pan dial, which turns left or right. Turning this dial moves the audio on that channel to the left or right of the stereo image.
Pan is useful for creating ‘space’ so your audio doesn’t end up mushing together. For a practical example, if you have a talk show where people are going to be talking, or even yelling, over one another, you could pan each voice slightly to the left and right so none are overlapping in the stereo image.
Pan doesn’t have too many other uses for live shows, but it’s there in case you need it.
Effects
You can find effects dials on most mixers, which allow you to adjust the intensity of effects you are using, normally labelled 0%-100%.
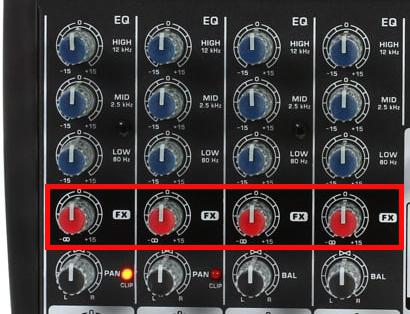
Some mixers have effects like compression, delay and reverb built into them, but others like the Behringer XENYX do not. Instead, you need to plug an effect into the effects input of the channel you want to affect, and then you can adjust its intensity using the effects dial from there.
EQ
The channels of your mixer will feature three or more EQ dials, labelled between 20Hz-20kHz. These are the limits of human hearing measured across the frequency spectrum, with lower numbers referring to the lower frequencies and higher numbers meaning higher frequencies.
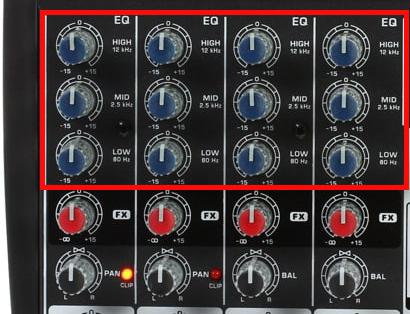
Adjusting any of the EQ dials will boost or decrease the amplitude of the frequency it controls. This is a great tool for controlling the finer details of your shows. Do you like the deeper frequencies of your voice and want to highlight them? Boost the lower frequencies on your microphone channel with the EQ dial and you’re set to give Barry White a run for his money.
Similarly, is the song you’re playing a bit harsh and tinny? Decrease the high frequencies and maybe increase the bass and mid frequencies to give it a bit more body.
Whether you use EQ or not is up to you, it just makes up another part of your arsenal when you start broadcasting live shows using a mixer.
Take it to the Next Level
Being comfortable using a mixer is the secret to crafting engaging and dynamic live shows that keep your listeners hooked.
Now you're equipped with the knowledge you need to confidently navigate your mixer, it’s time to put your knowledge into action and experiment to find your own voice and give your shows a character no other radio station can match.
New to live shows using a mixer? Maybe it’s time you gave it a try, and what better way than with our 7-day free trial? Begin your radio journey today!


